Wednesday, August 12, 2009

Last of the Long Beach Show

One of the exhibits at the show that fascinated me was a series of small quilts called the "Journal Quilt Project II: Elements -- Earth, Water, Air, and Fire". I was very much attracted to the quilts because of all the texture, work and artistry that had been poured into a very small space. I didn't actually measure any of the quilts; if I am remembering correctly, they were a little bit smaller than the calendars I have hung on the wall in several rooms of my house.


"Earth -- Canyons & Mesa" is by Suzanne Sanger of Brevard NC. It was very interesting to read her artist's statement as she worked through the process of how she made the quilt. From the dye-painting of the fabric to hand stitching to machine quilting to deciding how to finish off the edges, there was an immense amount of work here.


Here is a closeup. Suzanne stated that after hours of hand stitching the fabric she had painted, she put polyester batting behind the "mesas" and cotton batting behind the whole piece and then heavily machine quilted the piece to flatten it out and get the texture she wanted.


This was the only "earth" themed quilt that I photographed from this journal exhibition. All of the others were "fire" themed -- all of those HOT colors!


"On Fire" by Rosemary Claus-Gray of Doniphan OH. This quilt is made of many separate sheer painted and partially appliqued layers of silk organza that move around with the air currents. The colors are absolutely gorgeous and the movement makes you lean in closer to really take a look!


"Inflamed" by Marie Z. Johansen of Friday Harbor WA is very heavily stitched, embellished and beaded. The small beads stitched abundantly on this piece along with the iridescent threads catch the light and make it look as if it truly is on fire!


A close-up of the beading -- it also looked to me as if yarns were couched on under the beads with possibly organza used for additional sparkle. Hard to tell without touching, but I successfully resisted temptation.


"Fire Dancers" by Sandra Betts of Saint John, New Brunswick, Canada. The colors of this quilt were what initially pulled me in, but then I was intrigued by the three dimensionality of the body of the dancer at the bottom of the quilt. Then I saw more dancers as I looked closer; it became a game to see how many I could find.


"Fire Dancers" is my last picture from the journal project. This next quilt, which was the last photos I took at the show, is just WAY FUN!


"Pointless Possibilities" by Jamie Fingal of Orange CA is "fused onto wool felt, hand-stamped, free motion machine quilted". I just loved the ideas of the zippers -- the black fabric of the zipper tape and the metallic zipper teeth really stood out from the main part of the quilt.


Here's a shot of where two zippers end up near each other on the left side of the quilt -- one's coming and one's going! I also think the close-up gives you a better picture of the vividness of the colors and also shows the stamping technique. This just looks like it was a very fun quilt to make.


All in all, I liked the show very much -- to see the whole show, it is my understanding that there will be a CD for sale of all of the quilts. Also, you can to www.quilts.com/home/ and there are vidcasts of the show as well as a home page for all the Long Beach show highlights.

Tuesday, August 11, 2009

Long Beach Show (continued)

Just finished sorting through all of my pictures and rotating the ones I took sideways. I'm so amazed at the workmanship and innovation of so many of the quilts at the show. Here are more pictures; I'll probably have to spread them over at least 2 posts, possibly 3, as time permits.


One of the exhibits was Hollywood themed. This is one of the quilts included in that grouping; it is titled "Allright, Mr. Demille, I'm Ready for My Closeup" and was "fused, couched, painted, beaded, free motion machine quilted" by Sally Gould Wright of Los Angeles CA. The quilting was pretty awesome and I loved the necklace and scarf that were attached to the quilt. The necklace hangs below the bottom border and both the scarf and jewelry add so much dimension (as well as play value if we only got to touch!).


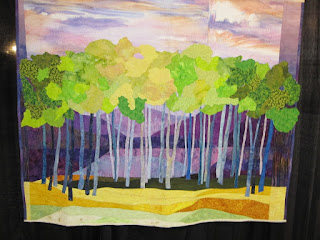
"Blue Ridge Springtime" has a pieced background with fused raw-edge applique, free motion and machine quilting.


There was a lot of texture in this quilt, so I took this closeup to study it better. The quilting that textured the leaves was quite dense and, along with the raw edges, added the visual interest that drew me in.


It seemed that many of the quilts that I was attracted to had a lot of texture, beads, applique and other accents that made them definitely art quilts rather than the more traditional quilts that had tended to predominate the first few quilt shows that I attended in the early 1990's.


"Sunrise Serenade" by Barbara McKie of Old Lyme CN. Description reads: "Hand-dyed shibori sateen combined with a disperse-dyed dahlia, machine applique, free motion stitching on non-stitch regulated home machine." This description was particularly interesting to me (the bold lettering for emphasis is mine and was not done that way at the show) because I had not yet seen a reference in a show as to whether or not the quilting was done using the stitch regulating feature available on some home machines, including the Bernina models that I use. It makes me wonder if we will see more of these explanations in the future.


Here is a closeup of the dahlia that was appliqued to the center. The three dimensional effect, including the drops of dew quilted into the petals as well as the way the petals folded in on themselves just like the actual flower, was stunning.


"Roundabout Grays" by Jeannie Palmer Moore of Escondido CA was "fabric dyed, discharged printed, stamped, free motion stitched and needlefelted." A lot of preparation went into the fabric and then all of the quilting and felting added the texture.


"The Awesome Mind" by Carolyn Ryan of Thousand Oaks CA is a combination of techniques: "painted fusible web, layered onto cotton base, stencilled, quilted" is the description. There was so much detail that I spent quite a bit of time in front of this one.


Here is one of the closeups to capture the delicacy of the leafy/branch-y details.


And another to show more of the surface painting.


"Fifteen Selvages" by Cindy Cooksey of Irvine CA -- makes me feel like I can't throw anything
away!


To Be Continued>>>>>>>

Thursday, August 6, 2009

Pictures from the Long Beach Show

Some of the absolutely best quilt shows in the country are put on by Quilts, Inc., out of Houston TX. For the past two years, they have had a show in Long Beach CA; this year the show was held in July with a preview session on Thursday evening, July 23, and the regular show hours on Friday through Sunday.


I worked in the booth of Unique Sewing Furniture for two of the show days. I have known Patrick Grant, the owner of Unique and the designer of all of the various sewing machine cabinets and cutting tables that they sell, for several years and have used his cabinets in my sewing room for at least 9 or 10 years. They are reasonably priced, made of wood (not plastic and/or fiberboard), look beautiful and hold up very well, even with the really heavy use that my machine cabinets have been put through. Those of you who have seen my "Fluff & Stuff: Machine Quilting with Paula Reid" DVD and have e-mailed and written letters asking who makes my furniture - Pat's the guy. His website is http://www.uniquesewingfurniture.com/.

Whenever I work at a quilt show, I really try to get up early enough on one of the mornings to go look at the quilts at least an hour before the show opens. That way, I can browse almost to my heart's content and take pictures without having too many people between the lens and the quilts! At this show, I noticed that a number of the exhibits prohibited photography, so I wasn't able to get as many photos as I wanted, darn it!

I learned a really great tip by watching one of the professional photographers at the show. Bonnie McCaffery (who is also an awesome quilter, designer, book author, etc.; check her out at http://www.bonniemccaffery.com/) had a tripod set up and was moving systematically through the show taking her pictures. I am just a beginning photographer and was thinking about how to keep track of the quilts and the makers so that I would be able to match them up later. I saw Bonnie take a picture of a quilt and then take a picture of the display sheet that described the quilt and had the name of the maker on it. Bingo - thanks, Bonnie!


So here are some of the pictures I took:


This is called "Village Ladies". It was made by Sylvia Davis of Los Angeles CA and machine quilted by Nadine Hegamin. Loved the striping on the top and bottom, the star in the center; in other words, the whole quilt! Here is a closeup of one of the "ladies:


I'm very attracted to these ethnic types of quilts as well as African fabrics, jewelry and the wonderful colors used in them. The mottled fabric used in the block backgrounds was very intriguing, too.


"No Turn on Red" was hand and machine pieced and quilted, as well as hand beaded, by Jo P. Griffith of Del Mar CA. Her artist's comment: "Sometimes a change in direction is needed even if it is not wanted." Since some of the fabrics had lettering printed on them, you could see that they were used backwards, upside down, even wrong side out!


"Spring in Japan" is machine pieced and quilted, machine and hand appliqued by Akiko Kawata of Osaka, Japan. I was just drawn into this quilt by the beautiful colors and applique. Just had to have a closeup:


And, finally for today, here's a closeup of the the beautiful Leslie Gabrielese quilt that I closed my last blog entry with:


Tuesday, August 4, 2009

Where do I get my quilting stencils?

I had typed a paragraph in my last post about my source for Destiny's deb quilt stencils and somehow it got omitted. I am still new at this and words that I had typed -- actually, whole paragraphs -- just seem to evaporate with the mere touch of a key! (I can hear you chuckling, fellow bloggers!) And I can't seem to find the "UNDO" key on the posting page!

I buy stencils wherever I happen to see them -- quilt shows, quilt shops, flea markets, online -- I mean anywhere! Whenever I walk into a quilt shop that is new to me, the first thing I do is start poking through their stencils to see what's new!
For years one of my favorite sources has been The Stencil Company in Cheektowaga NY. You can find them online at http://www.quiltingstencils.com/. The catalog #s referenced in my last post all were TSC's stencils and they are who you should contact to purchase those particular stencils. Cindy and crew also show up at the larger quilt shows and it is fun to get lost for hours looking at what's new and pondering all the possibilities! When you stop by their booth, you can also pick up one of their newsprint catalogs. The catalog has pictures of all of their stencils as well as the sizing and pricing info.

Except for the small feather pattern, all of the stencils that I used on Destiny's quilt were continuous designs. So they are definitely achievable by a beginning level free motion quilter. A beginner might want to substitute an easier design for that small feather, however, as it does require some "overstitching" to execute the design.
My collection of stencils numbers in the hundreds, maybe even more than a thousand, so I had to find a way to be able to find what I wanted in a reasonable amount of time. My stencils are sorted by size on binder rings and hung from a rack in size order. So all of the block designs are sorted by size: 4" and under, 5", 6", etc. Border stencils are sorted by width, starting with those 1-1/2" and under, 2", 2-1/2", etc.


All of the rings are hung on a rack system that my husband mounted on a wall in my sewing room above the fixtures that hold all of my thread. They're easily within my reach and I just have to grab the ring of the size I need and then browse through them to make my choice.


Here's a closer look. The rings are arranged so that the shorter borders and smaller block sizes are to the front with the longer/larger toward the back. Yes, sometimes I have to take off a couple of rings of stencils before I get to the size I want, but I haven't yet come up with a better way to store them. When I first started collecting them, I filed them by size in folders, but I outgrew that system pretty soon!


To totally switch topics, I was at a big, beautiful quilt show the last weekend in Long Beach CA. It was put on by Quilts, Inc., the same group that has brought us Houston for more years than I have been a quilter. The show was awesome and I took some great pictures that I will be posting over the next few days. But here's a peek:


Wow - is my picture crooked! This work of art is called "Nature Vivante" and was made by Leslie Gabrielse, a well knowm quilt artist from the Netherlands. He teaches at conferences in the United States occasionally. I also got a closeup from this quilt which I'll post next time......

Monday, August 3, 2009

Destiny's Deb Quilt, Part 2

Putting pictures in a blog is not the easiest thing I have ever tried to master, so breaking this up in sections was better than tearing out big clumps of multi-colored hair and throwing them on the floor in frustration!
With that said -- on to the free motion quilting. Destiny chose all of the stencils and threads, but left the actual quilting to "moi" -- I used the Bernina Stitch Regulator on the Bernina 830 machine for all of the free motion and I just LOVE the way that combo purrs along and gives me those even stitches that I want to see. I'm also very much appreciating that 12" wide opening so that fluffing & stuffing is even easier than it was on my "old" Bernina!


The outside leafy block is SCL-254-11 and the 6" center design is HH43-6. As a guide to "stencil speak", the letters are references to a collection (HH, for instance, is a line designed by Harriet Hargrave), the next number is the design number and the last number is the size. I usually choose a stencil sized 11" for a 11-1/2" to 12" block; this leaves sufficient room around the design so that I'm not bumping into neighboring blocks. The thread for the top of the machine was Sulky 40 wt. rayon, color #1204. The name of this color is Pastel Jade and it showed up nicely on the white background.
Once the blocks were quilted, I was ready to mark and quilt the borders. For the narrow inner border, we chose one of my old standbys, a narrow feather design. This is also from The Stencil Company, design HOI-141-1.5. A slightly darker Sulky rayon, #1094 (Med. Turquoise) was our thread choice.


Here's where things got a little tricky and where it helps to keep on top of all the gadgets and tools out there. Since the snowball blocks were white, I was able to use a water-soluble blue marker. I use either Mark-B-Gone or Nifty Notions; both brands can be seen easily and I have had no problems washing them out. However, I do run them through a full laundry cycle in order to do this. Don't forget that you have needlepunched any marker clear through all of the layers of your quilt in the quilting process, so you do need to make sure the chemical is washed out thoroughly.

Needless to say, blue marker was not going to show up on either of the border fabrics. Both brands also make a pink version of the water-soluble marker, but I chose instead to use my pounce pad, which is pictured above. When you purchase one of these, you are looking for The Ultimate Pounce Pad made by Hancy Mfg. Co. It will say on the package that the powder pounces on and irons off. I've only used the white and I absolutely know that it works very well.
To use this, you first have to fill the pad with the chalk that comes with it, pound it up and down a couple of times on a piece of fabric to get the chalk powder flowing and then position your stencil where you want it -- if spacing is involved, I have already figured that out at this point and made small placement markings (I call them registration marks) on the quilt so that I will place the stencil properly. Then you just swipe the filled pad over the stencil, lift the stencil and move it to the next repeat. It marks very clearly, as you can see below.


This border was quilted using The Stencil Company's SCO-101-05. In a later post, I'll have to show you how I store all of these so I can find the right one easily! The thread we chose was the darker turquoise Sulky thread that was used in the narrow feather border.

So all we had left to do was bind the quilt, get it to the auction on time and SMILE when the quilt was purchased for $500!!!


Here's a picture of Destiny with the finished quilt. The quilt was made using my Batts in the
Attic pattern, Summer Stars. If you would like information on purchasing this pattern, you can use this link: www.battsintheattic.com/PrimaryPages/quilts_a.html


Sunday, August 2, 2009

Destiny's Debutante Quilt

My goddaughter, Destiny Kincaid, is a debutante this year! It is absolutely amazing to me how quickly they grow up when you feed and water them regularly.....She's 18, just graduated from high school, and on her way to college later this month.

The debutante experience is a program in our community that teaches young women skills that will last them a lifetime. One of the main focus points is that we give back to our communities by helping various charitable organizations that help those in need. The debutante class of 2009 had a fashion show that was held last Sunday and the quilt that she and I made for the occasion was auctioned off to the highest bidder. I'm using the words "she and I" pretty loosely -- Destiny did all of the sewing (LOOK at her go on the brand new Bernina 830!!) -- and I did the cutting and pressing. Once the quilt was pieced, I took over and did the quilting.

She decided that mitered corners would be the best border option for this quilt and I just had to take a picture of the great job she did on them!


The first step in the quilting was to sew diagonal straight lines in both directions through the pieced blocks. I used monofilament thread in the top of the machine and Mettler Silk Finish 100% cotton thread in the bobbin. I definitely appreciated the larger bobbin size on the 830 as well as the low bobbin indicator on the face of the machine. I have been playing around with the dual feed feature of this machine and decided to use it instead of the walking foot. I think I still like the walking foot for quilting, but like the dual feed for better accuracy in piecing.
Related Posts Plugin for WordPress, Blogger...