Sunday, June 13, 2010

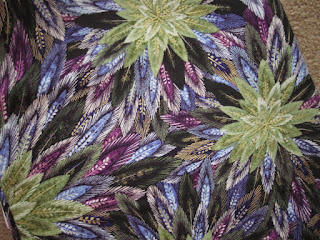
A Marvelous Quilt From the HMQS Faculty Exhibit


I still have a few pictures from the HMQS show that I haven't put up on the blog yet, the above being one of my favorites. It was designed and pieced by Gayle Wallace, one of the other instructors at the show. The information on the card did not mention whether Gayle also did the quilting. The name of the quilt is "Star Light, Star".....


I took this closeup with flash so that you could see all of the quilting in the dark background, as well as the over 30,000 beads that were hand stitched to the quilt as "waving". I'm not sure what waving is; maybe the ribbon work?

There is some controversy about the use of flash in quilt photography, but in the case of a dark quilt like this, there is no way to capture the quilting stitches without the use of flash. People have asked me about it when photographing my quilts and I always give the OK to use their flash.


In the picture without flash, you don't see the quilting or the beads as well, but you get the true picture of the fabulous fabrics and colors Gayle used to make this quilt.

I'll be in Minden NV for the next few days visiting my friend Mary Ponce. I'm very excited about this as Mary is the person who inspired me to quilt in the first place. We both have quite a few quilts that we made either in one of our sewing rooms or during the many retreats we attended before she moved out of the southern California area.

I'm taking a couple of piecing projects -- one a block of the month where I need to finish two blocks and put them together and the other a baby quilt. Taylor was born in August -- I'm a little behind.....but her colors are hot pink, chocolate brown and cream, so this will be a lot of fun!

Saturday, June 12, 2010

Save the Dates! Southern California Quilters' Run Is This Month!


The quilters' run is an annual frenzy when quilters pile into their cars (there are even prizes for the designated driver of a group of 6 or more) and, following a special map of participating quilt stores, drive from store to store to shop and see all the special events that each store offers. I think there are around 34 shops participating this year.

Above is the logo that Peggy Vachon designed for Bolts in the Bathtub. This is the stitched out embroidery version -- the same design is painted on the front window of the store.


The stores are broken up into 4 separate regions so that quilters don't have to get their passports stamped in every shop on the run to qualify for a prize; there are other prizes if they visit every shop in a region. Each shop also has a drawing for a basket of goodies; those winners are drawn from the passports that are turned in at the end of the run.

All of the stores in our region made blocks and each store is making a quilt using the blocks. Above is the one that Bolts in the Bathtub made....


...and a closeup of the "Welcome to Our Neighborhood" lettering. The quilt will be finished and on display in the store on the run dates.

Run dates are: Thursday through Sunday, June 17-20, and Thursday through Sunday, June 24-27 -- DON'T MISS IT!

Friday, June 11, 2010

Shopping for the Floral Visions quilt

The other day, I had gone over to Dawna Harrison's (the owner of my "neighborhood quilt shop" Bolts in the Bathtub) to see her newest machine embroidery project, the Floral Visions quilt. I did a blog entry on this on June 1, but for some reason the header won't paste here....

So when she called me to tell me her blocks were done, I went over to the shop to take a look.


This is the block that Peggy Vachon stitched out; her's is on a really pretty solid green background.


Dawna's are on white with green, pink and periwinkle threads...


This was my favorite -- loved the delicacy of the pink lace stitches. There isn't any periwinkle in this block, so Dawna is digitizing an additional flower that will fit into the lace portion of the design.


I played around with background fabrics and threads and came up with the combination at the left -- plums, greens and golds. One of the threads is named "Bordeaux" -- how fitting!


My background fabric is a tone-on-tone beige leaf print.


Later that day, my husband Dan and I were in a card shop at the mall, buying a birthday card for our granddaughter Zoe, who will be 4 tomorrow. Dan found this box of note cards and told me that we had to buy it for Dawna -- the kitty looks very much like her Emma and the rubber duckies are SO her.

When you go to Bolts in the Bathtub and your stack of bolts is accumulating, you put a rubber duckie on top so that the people working in the shop know that those fabrics are "in use" and won't put them away before you're done with them.

Dawna promised to hold my hand through the embroidery process; I just need to find some time to get to the shop and work on the Bernina 830. The blocks are digitized for the Bernina jumbo hoop that only fits the 830 -- it is huge and eliminates a lot of re-hooping. Since hooping is not my favorite part of the process (although the Master-Hooper has made it a lot easier), only having to hoop once is a big bonus!

Tuesday, June 8, 2010

Teaching and Shopping at the Cotton Patch

"Fluff & Stuff" was the two day class that I taught over the weekend at The Cotton Patch. Everybody brought quilts to work on the first day and then practiced free motion techniques on the second.

Here are some pictures from the class:


I also did some shopping -- with everything 30% off, how could I resist?


Four polka dots -- the yellow is actually a diamond shape, but I think it still belongs in the polka dot family. Almost missed the orange, but Carolie pointed it out, so I snagged some....


A pink fabric from Robert Kaufman that I didn't have-- I do have it in other colors, though, because it's a really versatile blender....it's part of the Fusions collection.


Absolutely had to have this large scale print, also from Robert Kaufman, in the Imperial collection....


And I found some very cool things to go with it; so, Carolie's sale was very good for my stash building efforts!

Saturday, June 5, 2010

Cotton Patch -- Lafayette CA -- This Time with Pictures!


One thing you have to like about The Cotton Patch is that everyone gets the red carpet treatment here! Located at 1025 Brown Avenue in Lafayette (phone 925-284-1177), the store is overflowing with fabrics, notions, books and all other things that we have to have to pursue our craft.

With the big sale going on, I had to wander the store -- I found a few fabrics (well, nine) that leapt into my arms and begged to go home with me, especially since Carolie Hensley, owner of the Patch, shares my polka dot passion. I almost missed a bright orange background with dots of black, blue and a couple of other colors on it -- Carolie pulled it off the shelf and said, "You gotta have this!" I also found a green and purple large-scale floral print and a few of those blenders that we can't ever get enough of. And, of course, a couple of pink fabrics that I didn't have yet.


In case there's any doubt about what's in there, just look at the bright red sign! And there are always special sale deals out on the porch, half price patterns and fabrics that would make great quilt backs...


The area where I was doing demonstrations and answering questions yesterday was near the front door so I got to meet and greet and sew......this is Tara helping me clear some space for all of the stuff that I brought to work with.


Lots of fabrics and books; the cutting stations (I think I counted three, so there wasn't a long wait, even with the big sale) have 1/8 yard lines scored into them to make it easy to cut (with scissors, no rotary cutters and mats here) exactly how much the customers need.


Also got a chance to take a look at the new Bernette, a small lightweight machine to cart around to piecing classes. It's in the under $200 price range, which is a new market for Bernina.

The Cotton Patch has a detailed website, www.quiltusa.com, where you can find more information about the shop, classes, special events and news, including the dates and percentage discounts of the current sale.

Carolie is also one of the founding partners of C&T Publishing, where some of our very best quilting books come from, including those by Alex Anderson and other well-known authors. I've also very much enjoyed the C&T Publishing blog, which has timely articles about different things going on in the quilting world. To see the blog, click here.

Friday, June 4, 2010

Cotton Patch -- Lafayette CA

I just sat down with my computer and a glass of Zinfandel, fired up the internet, and realized that I had left my camera at the store! So a post without pictures??

We had a fun day at Cotton Patch -- it was a day spent in one of my favorite pasttimes -- with a quilt in my lap and my butt parked in a chair in front of a machine! This particular machine is a Bernina 820, one of the two models of Bernina machines with a 12" creative space for quilting. There is also an additional inch in open space height on these machines. I figured it out today -- the difference between the 820/830 and a standard machine is 28 square inches of additional space to shove your quilt through! And I haven't even figured out how many cubic inches that is!

But I digress; it was an especially fun day because I was doing demonstrations in the store and there was a big sale going on (30% off everything through Monday 6/7, then there will be 25% off for a week, and so on in descending percentages off, so get in there soon while the percentage is large) so there were lots of people to talk with and many quilt-y questions to answer, the most common being: How the heck do you get that great big quilt in there? Well, I brought one and did a show and tell of how I fluff 'em and stuff 'em right through that space -- of course, with the 820 I almost feel like I'm cheating because there is so much space there to begin with....

Tomorrow and Sunday, my Fluff & Stuff two-day machine quilting class will be going on, so I promise to get some of those pictures up tomorrow night -- at least the ones I took today. Until then, have a great Saturday!

Wednesday, June 2, 2010

Debbi Lamb's "Positive/Negative" Show & Tell


Debbi Lamb was one of the participants in the "Positive/Negative: Adding Color to Trapunto by Machine" workshop that I taught at Sew From the Heart in Scottsdale AZ last month. Yesterday, I was delighted to find that she had taken pictures of her finished project and e-mailed them to me -- so I can, with her permission, share them with you!

Here is her message: "I wanted to have a 'show and tell' with my Positive Negative wall hanging. I finally got all that stippling done! Oh....my eyes! Anyway, I SO enjoyed this class that you taught at Sew From The Heart and wanted to 'show off' my version of your teachings. So, attached are a few pictures of my efforts. I embroidered the sashings and meandered on the outer border. What a FUN project! Thank you for coming to Phoenix and spending the time to teach us."


WOW -- thank you, Debbi -- for the kind words and the great pictures! The picture above is her finished project....


Here's a closeup of one of the two blocks where the color is in the foreground of the block....


...and where the color is in the background of the block.


Closeup of the tiny stippling with variegated thread; Debbi agreed with me that about 45 minutes of this is the limit before our eyes went blurry!


And here's the meandering in the outer border.....


Even a picture of the back -- I'm really intrigued by the machine embroidery that she did in the sashing blocks, probably with one of the machine decorative stitches?


Debbi even put on a label! I have to admit that that is where I really drop the ball; probably only a few of my quilts have a label on them. I've finally resorted to writing the pertinent information in fabric pen somewhere on the back just to get it on there.

What about all of you -- do you have ideas for labels? What motivates you to get that last part of the quilt done? Any secrets, tips, tricks? Inquiring minds.....

Thanks so much, Debbi, for sharing this with all of us!

Tuesday, June 1, 2010

Floral Visions -- An Embroidery Design Morning

Yesterday morning dawned bright and beautiful; it would top out in the high 80's here. A bit (no -- a lot!) windy, but we can't have everything, right?

Bolts in the Bathtub, the quilt shop that my friend Dawna and her sister Fay own, is always closed on Mondays, so that's the day that Dawna spends working with her Version 6 software and sewing samples for the shop -- the things she can't get done during the work day. She's been working in the software to get everything ready to teach the OESD Floral Visions quilt.


One of the things she did was to come up with this design in the software and stitch out this pillow top with her initial in the center.


These are the Isacord threads that she used....


Floral Visions (which she keeps calling Floral Illusions, although we can't figure out why) has eight blocks in the quilt. Here is one of them that Dawna stitched out in the original colors. We aren't crazy about the greens, so we went into the software yesterday morning and chose different colors for the blocks. And I have to say "we went into the software" with my fingers crossed -- Dawna did all the software maneuvering; I just read off the color numbers.

We saved two versions of each block, one with her colors and one with mine. Hers are pinks, periwinkle blues and greens more toward the blue family; she's planning to make her quilt on white background fabric. Mine are purples, golds and greens tending more to olive; I'm going to stitch them out on a light gold sateen.

Now all we have to do is find the time to stitch them out!

Sunday, May 30, 2010

The 12 by 12 Project


This was a really fun exhibit at HMQS -- it's amazing what a quilter can do in a square foot of space!


This exhibit just made me want to get out all sort of creative things and run to the sewing machine!

Saturday, May 29, 2010

"Partial Seaming" for an Appliqued Border

Alex Anderson sent me her quilt top that will be published in the December 2010 issue of The Quilt Life magazine. So I'm not going to show you much of it now -- you'll have to see it when the magazine arrives in your mailbox!

Along with the top, which is both pieced and appliqued, she sent me four appliqued borders to be attached to the top. The problem was that each border had a distinctive start and end so that the borders could not be put on in a normal (i.e., straight or mitered) manner.

Partial seaming was the solution.....


First, I measured the width of the border, which was 6-1/2" cut, then the width of the quilt top. Adding 6" (6-1/2" minus two 1/4" seam allowances) to the width of the top gave me the length measurement for the border. I cut the border, then pinned it to the quilt top, leaving unattached the top 6-1/4" of the border. This will be sewn last when the partial seaming is complete.


I took the quilt top to the sewing machine and sewed the bottom few inches of the border to the quilt top and left the remainder of the seam pinned.


Then I pressed just the sewn part of the seam toward the border.


Then I was able to rotate the quilt top 90 degrees, measure across the center in the next direction, cut the second border strip to that measurement, then pin and sew the second border strip to the top. When doing partial seaming, you are going around the quilt rather than sewing on opposite borders as in more frequently found border treatments.


After the second, third and fourth border strips were put on in this same manner, I was able to complete the pinned first seam for a good example of "partial seaming".

On to the quilting....


Related Posts Plugin for WordPress, Blogger...