Wednesday, March 30, 2016

Got My New Copy of Block Magazine Today!

Last September I taught at Linda Z's in Chicago -- so much fun and such great people to work with! But this trip had a very expensive side effect. I stayed with my friend Carol and she had a whole stack of Block magazines from Missouri Star Quilt Company. I started reading, couldn't stop, set up an account and subscribed to the magazine as well as ordering all the back copies. And then the daily deals started coming in my inbox and some of them were irresistible -- do you see a looming train wreck here?


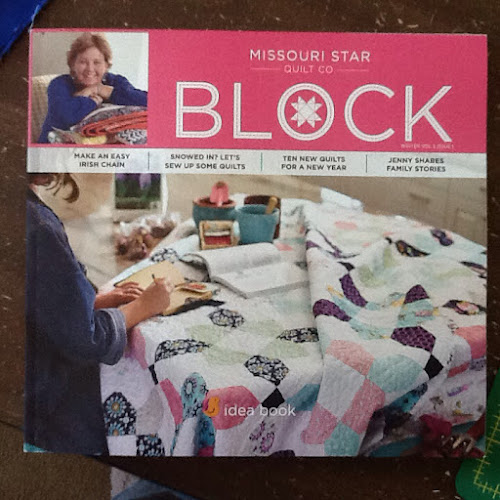
This is the magazine that just arrived. As soon as I get it, I have to sit right down and look at all the pretty pictures and decide which is the quilt that I just may have to make. There were probably three or four that caught my eye, but I definitely had a favorite!


In the book, this is called Studio Star. The traditional block used in this quilt is my very favorite in the whole world! All of the traditional blocks seem to have more than one name, but I know this block as Sister's Choice and it's the block I used in one of my quilts.


Make Mine Neapolitan is my spring/summer nap quilt; I quilted it with a silk blend batting so that it's very light, yet still really shows off all of the feathers that I quilted. My inspiration for making it was that Alex Anderson asked me to make a quilt to be photographed for her book from C&T Publishing called "Neutral Essentials". I sort of had a mental problem with making a quilt entirely in beiges, creams, tans, etc., so I sprinkled pieces of pink fabrics throughout the quilt -- that's what made the name Make Mine Neapolitan work just perfectly!

If you have also become a Missouri Star addict and have a copy of the magazine, you'll find the pattern right there. If not, you could always subscribe and get it or, if you love this quilt as much as I do but don't have access to the mag, you could buy the pattern for Make Mine Neapolitan through my website. Or you could look up the Sister's Choice block, grab a jelly roll and some background fabric, and start sewing!

I love that the Missouri Star version calls for a jelly roll; Make Mine Neapolitan has about 100 fabrics in it and calls for 4-5/8 yards assorted neutral prints for blocks, all of which were cut into 2-1/2" squares. The pattern back does say that you could use "rolls of 2-1/2" strips available at some quilt stores" -- this makes me laugh now that we can get them absolutely everywhere! I wrote this pattern in 2007; shopping for quilt fabric has certainly changed since then!

I love pre-cuts and have some all ready to go with background fabric, patterns, border fabric -- in other words, an assembled quilt kit. I'll be home for about a week and a half and am hoping to get some sewing time in.

Do you like pre-cuts? What's your favorite -- jelly rolls, honey buns, layer cakes, charm packs? Would you be willing to share some pictures of some quilts you've made from pre-cuts? There may be a prize involved.....

Tuesday, March 29, 2016

Tips & Tricks: Marking Designs on Your Quilts

Tuesday Tips & Tricks!  Today I want to tell you how I mark designs on my quilts.  I've done this for a long time and have pretty much perfected my methods!!  Most of the time, I use the Wonder Markers by Collins to mark quilting designs onto my quilts. These are a bright blue water soluble marker that is easy to see on all light fabrics and some mediums (turquoise and greens being exceptions). 


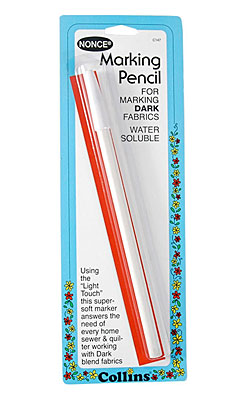
For dark fabrics, I use either a Nonce pencil or the white pencil made by Quilters Resource. These don’t remove as easily as the blue marker, but they do have their place as you can’t quilt what you can’t see. 


Occasionally, I have had luck with the old fashioned sliver of soap, but you really can’t do too intricate a design with that; it does work well to mark straight lines, such as crosshatching, or subtle curves. Forget it if you have your heart set on feathers!

Another marking tool that works well for designs that are not too fussy is the Pounce Pad. It looks like a chalkboard eraser. It has an opening on the back (with a little plug) that you fill with a chalk powder (that now comes in PINK too!!!).  To use it on dark fabrics, place place a stencil on your fabric. You can then “pounce” lightly and the chalk sifts through the pad and through the channels of your stencil to leave a distinct, easily removable design on your fabric. When I use this, I mark one block at a time and then brush the chalk away after stitching.
 
I am a total stencil “junkie”! I can’t draw, so I depend on stencils for the design elements of the quilts I stitch. I look for stencils everywhere I go — quilt shows, new shops when I travel, ads in backs of quilting magazines. I used to also cut my own from plastic until I found Golden Threads Quilting Paper. It is a gold colored paper that comes in various widths (I have been using the 12”). You can trace a design on it and then stitch through the paper. The paper tears away easily from your quilt top and doesn’t tear your stitches. Also, if you want multiple copies of a design, you can stack up several sheets of the paper, draw your design on the top sheet and “needlepunch” the whole stack with an unthreaded machine. What a timesaver!


I hope this helps you mark your quilts a little easier and gives you some new ideas!!
For more tips, visit my website.
Happy quilting!!

Paula

Monday, March 28, 2016

Giveaway Winners!!

Thanks to everyone who visited during the Quilt Qwazy Queens Blog Hop!!  It's so fun to read your comments and kind of get to "meet" you!  I had two giveaways going on... a gift certificate to Fat Quarter Shop and a Quilty Box full of English Paper Piecing goodies.  

Drumroll please.......

Cecilia Y. is the winner of the Fat Quarter Shop gift certificate!!!


Tonia from All Thingz Sewn wins the Quilty Box!!! (Check out her blog... it's wonderful!!)


http://allthingzsewn.blogspot.com/


Congrats to you both and we'll be contacting you to get your info!!!


Saturday, March 26, 2016

If You've Ever Wanted to Buy a Craftsy Class...

Forget spring cleaning –– spring shopping is much more fun, especially when the sale is this good! Shake off the winter blues and kickstart a season chock-full of creativity with 50% off ALL Craftsy classes!!  Plus, hundreds of best-selling classes are only $19.99 –– but both deals end soon! 

Every single class is on sale for 50% off so if you've ever wanted to buy a Craftsy Class, now is the time!!

Click HERE to shop through my affiliate link!


 http://www.craftsy.com/ext/PaulaReid_holiday


Friday, March 25, 2016

Perfect for a Weeknight -- Super Simple No-Recipe Shrimp Supper!

Several of my friends have commented that almost every meal I photograph is chicken! That's true, we eat a lot of chicken, but sometimes you just want something different. I make my share of chili and spaghetti sauce and crockpot fare, but once in a while you not only want something different, you need it to be fast! This only took 20 minutes start to finish, but I had two shortcuts: leftover cooked, but unsauced, spaghetti and shrimp that I had put in the refrigerator to thaw this morning.


Basic ingredients are spaghetti, defrosted large shrimp (this is one pound, half of a 2-lb bag of tails-on raw large shrimp from Costco), Chesapeake Bay Seasoning from Penzey's (you could also use Old Bay Seasoning from your grocery store), butter, olive oil and a jar of Classico's Four Cheese Alfredo Sauce.


I removed the tails, spread them out on the cookie sheet and sprinkled them with the Chesapeake Bay seasoning.


Once the shrimp start cooking, this moves pretty fast, so I wanted to get a head start on the salad before the shrimp went on. I used half a bag of romaine salad and half a bag of baby spring mix, green onions, little tomatoes and an avocado, all from Trader Joe's. The dressing is Girard's Light Champagne -- yum!


My favorite salad making knives from Pampered Chef -- the serrated one is perfect for tomatoes!


Once the salad things are chopped up, I can go back to the shrimp.


Heat a couple of tablespoons, more or less, of olive oil and toss a couple of tablespoons of butter in to melt.


Sauté for just a few minutes until they start to turn pink....


...then add the sauce. Once it heats up and bubbles a bit, the shrimp will be done.


Add the dressing to the salad, toss and serve.


The spaghetti was reheated in the microwave and topped with the shrimp Alfredo -- 20 minutes and dinner is ready! WAY faster than chicken!


Thursday, March 24, 2016

Quilt Qwazy Queens Blog Hop!!!

Thanks to Marian Pena of Seams to Be Sew for hosting this Blog Hop!!   I am so excited to be a part of Quilt Qwazy Queens!

http://www.seamstobesew.com


If this is your first visit here… WELCOME!  If you’re a follower of mine already, take time to visit each blog on the hop each day… there are creative ideas, fun stories, and fantastic giveaways at each stop!!


So... I am absolutely a Qwazy Quilting Queen!  Here's my story...

My husband Dan knew I was going to love quilting before I did!  He and I went to a quilt show with a good friend of mine and her husband in March 1990.  While I was looking at the quilts with Mary, Dan and Steve were wandering around and talking to the vendors.  When I left the quilt viewing area, Dan handed me a big bag with an Omnigrid 6”x24” ruler, a 45mm rotary cutter and a huge green self-healing mat.  He said, “You were in there so long I know you’re going to love this!”  I had an old Sears Kenmore machine that I probably got when I was in my late teens, rarely used but carted around from house to house as I progressed through my adult life.

Three weeks after Dan gave me the goods, I locked my keys in the trunk of my car, decided to spend a day at home, and made my first quilt from fabrics leftover from drapes and an open package of low loft polyester batting that was probably purchased to pad a cornice.  I spent the day piecing, quilting and binding a lap size quilt.  It is worn and faded from many years of use and sunshine from being draped over a sofa in a south facing window (who knew?), but it is my first quilt and I will love it always!


The whole day I spent making that quilt I was thinking to myself how much fun sewing was and that I really should spend more time doing it.  So I made a few more quilts, decided that I really loved it, bought a grown up machine and made a few more.  Did a little teaching, then decided to leave my day job and go into machine quilting for others full time on my domestic machine.  My life totally changed due to that small series of circumstances leading to the making of that very first quilt.

I count my blessings daily that I get to do this for a living!  Even pinch myself occasionally to make sure I am really awake and on that plane to the next quilt store or sewing machine shop that has invited a group of people for me to teach my particular take on machine quilting on domestic machines.  I am also truly grateful for my husband, who understands that I just need to get out there and travel and meet new students and see old friends.  He treats me like I truly am the Queen!

So to continue with the Queen theme – it sounded terribly British to me, so I thought what could be more British than English paper piecing?  I just happened to receive a Quilty Box on that very topic in January and thought 
MAYBE ONE OF YOU WOULD LIKE TO WIN IT???  
Simply sign up for our newsletter at our website and you'll be entered to win!!  
We'll announce the winner next week via email and social media!!  


And now for the lineup of blogs on this fabulous blog hop I know some of these dates have passed but you should still visit the blogs... they are wonderful!


After You leave your comments at the above blogs
Stop In To Enter Only At
Seams to Be Sew

After You leave your comments at the above blogs
Stop In To Enter Only At
Seams to Be Sew


As a gift to everyone,the Fat Quarter Shop is offering  a 10% discount during the hop.

 (This is not good for gift certificates however.)

Use this code at checkout to receive 10% off your purchase:

seamstobe316


And finally… how to enter the giveaway.  And a BIG THANK YOU to Marian Pena of Seams to Be Sew for putting this together and to Fat Quarter Shop for sponsoring this blog hop and donating the giveaway!  

 To enter, simply click on the Rafflecopter below!

Good luck and thanks for stopping by!


a Rafflecopter giveaway

Tuesday, March 22, 2016

The "ins" and "outs" of Batting

Tuesday... time for Tips and Tricks!!  Hope this helps some of you!


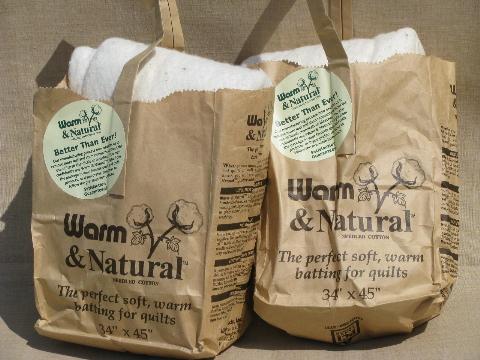
When it comes to batting for my quilts, I choose cotton batting all of the time. I love the “quilty” look that cotton batting gives to quilts after they are washed. There are several good brands available and you even have choices in color now that Warm & Natural and Quilters’ Dream Cotton have both come out with beautiful white batting. If you choose to use polyester batting, however, make sure that you are using a very low loft batting. Your quilt top tends to “float” on top of a high loft batting, no matter how well basted, and it's too easy to stitch puckers into your quilt.

There are occasions when I want to pre-wash my cotton batting. If I am working on a contemporary quilt where I don’t want that old-fashioned “quilty” look, I'll wash the batting first. I will also pre-wash if all of the fabric for my quilt top and back have been pre-washed. I like everything to be shrinking at the same rate! To pre-wash a cotton batt (I have done this with both Warm & Natural and Quilter’s Dream Cotton with excellent results in my washer), I put the batting in my washer on the SOAK cycle and set the wash action to gentle and the water temperature to warm. You want as little agitation as possible here. After soaking the batt for about 15 minutes, I set the machine to spin. After spinning is complete, put the batt in the dryer with a couple of towels to absorb the moisture. This helps it dry a little more evenly so you don’t have to keep taking it out, rearranging it and putting it back in. Remember to buy extra batting if you intend to pre-wash as the batting shrinks by about 5%.

Before basting your quilt top, it is important to get all the lumps, bumps, wrinkles and folds out of the batting. If I have time, I just lay the batting out overnight, but sometimes I don't have overnight to spare. In that case, I put the batting in a warm dryer (WITHOUT moisture; I don't want to shrink it unintentionally) and run the dryer for about 15 - 20 minutes. This will usually relax the batting and get rid of the wrinkles. Of course, if you have pre-washed your batting, the wrinkles will already be out!


And what about storing batting?  I love my method!  How do you store your batting?

Paula

Sunday, March 20, 2016

My Style Sunday: Stitch Fix #26

As always, I eagerly anticipated the arrival of my next Fix. Those of you who have read previous blog posts about Stitch Fix know that every few weeks a box arrives at my house with five items of clothing in it. I get to try them all on, mixing them with stuff I already own, and then decide what I want to keep and what I'll send back in the enclosed postage paid envelope.
Since spring will be here soon, new goodies for the season will be great! Between now and the arrival of my next Fix, I'm going to North Carolina for a few days and spending some time at home. North Carolina will probably be about the same temperatures as here and maybe a little rain.


The first two items out of the box were a white lace top and a pair of pink pants. I knew I liked the top, but didn't know how I was going to work it in; the fabric of the pants was a little thin and produced a visible panty line, so they were definitely a Return.


Rear view confirmed my decision -- return the pants and keep the top.


Next was the blue blouse; I grabbed a pair of my own black pants for this picture. Didn't think the blouse was particularly flattering, so it's also a Return.


The black lace pencil skirt was the next thing out of the box -- really liked the way it fit, love lace! It's a keeper. Not sure about it with the white top, though, so let's play!


First I tucked it in and belted it -- nope, not a good look!


However, the last item out of the box was a 3/4 sleeve cardigan with some great detailing in the front -- Score! Now I can keep the skirt AND the cardigan and have a great outfit for spring!


I was still determined to work the top in, so started going through some of my other skirts. This one is from White House Black Market and the ivory colors really work well together. However, I wanted more of the skirt to show. Back to the closet!


Grabbed a vest that I bought from Cache (it was such a bummer when that whole chain closed!), tucked in the top and now I have another outfit for spring.

Outcome for this fix: Pink pants, returned; blue blouse, returned; black lace pencil skirt, kept; black/white cardigan, kept; white lace top, kept. That's pretty good! Three pieces kept, two great outfits! Cost for the three pieces was about $175, but since you pay a $20 styling fee up front each time, that was subtracted from the cost as well as another credit that I had from someone else who doesn't love or have time to shop signing up through my link on the blog. So the three pieces were $130, within what I consider a reasonable price range for a skirt, cardigan and top.

Next fix will arrive April 1 -- can't wait! Hope it isn't an April Fool's Day thing!

I'm participating in a fun Stitch Fix Linky Party HERE!!  Check it out!


Linking to Crazy Together

Friday, March 18, 2016

Foodie Friday: Cooking from Rachael Ray Every Day

I used to have a television in my sewing room and most of the time it was set on the Food Channel. At some point, I decided that I needed more space on my desktop, so the TV was out and a great big monster monitor came in. But by that time, I was totally hooked on a few of the chefs, one of them being Rachael Ray. Love her perkiness! Love that each piece of that diced onion didn't have to be perfect! Love that she could get a whole meal on the table in 30 minutes -- always took me 45, but that's OK.
I've been a subscriber to her magazine, Rachael Ray Every Day, since the very first issue and usually cook a few things from it every month. I'm not one of these people who has a few staple recipes and makes them over and over -- I rarely make the same thing twice.
We love roast chicken because it's so yummy and produces great leftovers, so the Pan-o-Rama article caught my eye -- three ways to roast a chicken in a cast iron skillet. Didn't matter that I don't have one, a roasting pan will work, right?
The only thing I did different from the recipe was instead of salt and peppering the chicken, I used the Ultimate Roast Chicken Rub from Williams-Sonoma. When I run low, I always buy two cans of this because I use it every single time I make chicken. The recipe called for fresh thyme; happened to have that on hand from another recipe. The thyme was used both inside the chicken and tossed with the veggies. The chicken roasted for about 25 minutes before adding the veggies.
Cauliflower, cherry tomatoes, thyme and shallots in a big bowl...
Pour over a couple of tablespoons of olive oil and toss.
Arrange the vegetables around the chicken and put back in the oven for about another 35 minutes.
All done! Dan doing the carving...and then to the plate! This was excellent and I think I may break my rule for making something twice....although a recipe on the same page for Glazed Sesame Chicken with Mushrooms & Bok Choy is intriguing!  Here's another way to cook a delicious chicken!  Don't love chicken??  How about pork?

Happy Feasting!!

Paula


Tuesday, March 15, 2016

International Spring Cleaning Month - CLEAN OUT THOSE SCRAPS PEOPLE!!

I just learned that March is “International Spring Cleaning Month” – what are you doing to celebrate?  One of my friends who quilts all the time and rarely cooks told me she was planning to dust her kitchen!  Me?  I’m cleaning out my stash….I do this about every three or four years, going through all the fabrics, touching them, petting them, daydreaming about the wonderful quilts I could make if I had more time.  Some of my fabric pieces are fairly small and could probably qualify as scraps, but I just can’t bear to toss them. 

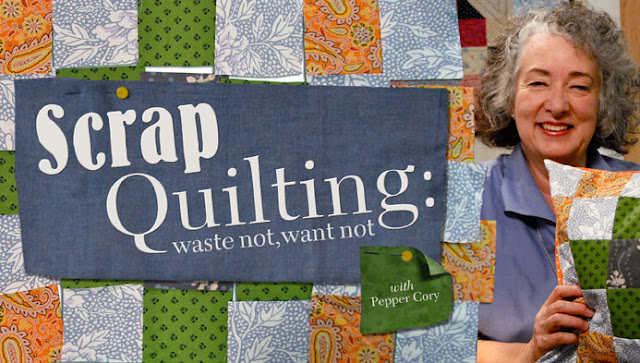
So it might be time to get a new Craftsy class about using up these scraps – there’s one from Pepper Cory called “Scrap Quilting: waste not, want not” – that sounds just perfect!  Pepper has written many many books over the years; I’ve always enjoyed her teaching style and her sense of humor, so here’s an opportunity to get her off the pages of the book and onto my iPad screen.

The first time I met Pepper was one of the most embarrassing things I’ve ever done/said!  We were both teaching at an AQS show in Knoxville TN several years ago when we were seated near each other at breakfast in the hotel.  After some conversation among the group, she introduced herself to me – “I don’t think we’ve met – I’m Pepper Cory!”  My brain immediately flashed to the large stack of quilting books next to my reading chair and I said, “Oh! I have your picture in my living room!”  Pepper gave me a rather odd look and so I explained about the stack of books…..it was awkward and embarrassing and so totally me!

So if you'd like to check out her class "Scrap Quilting: waste not, want not" click HERE.  You'll LOVE it!  (And it's on a super sale right now!!)

Happy Cleaning!!!!!!! 

Paula

http://www.craftsy.com/ext/PaulaReid_57_CP

Related Posts Plugin for WordPress, Blogger...